Showing posts with label home decor. Show all posts

Friday, November 13, 2015

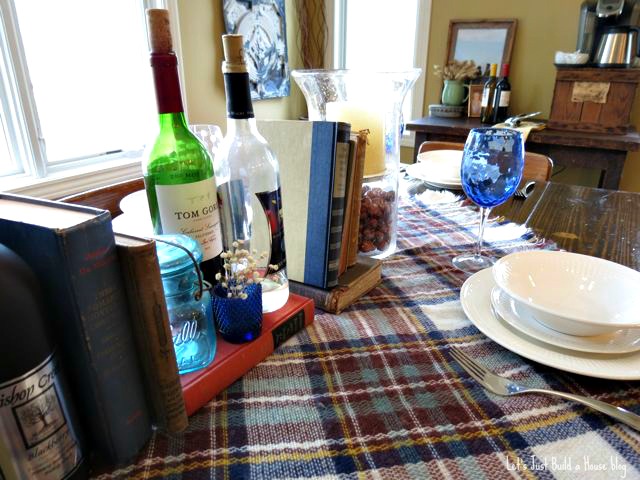
Dinner Party: Serving Wine...Only Wine.

I've never did the ~holiday tablescape~ thing before.  To be completely honest...I do sort of think it's a tad crazy to set up a fancy table setting just for pictures on the internet. Maybe some people really have people over after they set this all up and enjoy an elegantly styled dinner and drink fancy sounding drinks. They maybe even use those cute paper straws--and maybe they don't get soggy.

Today, I officially join the other bloggers in the crazy club--errr imaginary guest table.  My mother-in-law was cleaning out her basement and gifted me some old white tableware. Plus, I had an entire day off to myself this week. Adam worked and Ben went to the sitter. I caught up on laundry, gave Scout a bath, watched reality tv (90 Day Fiance anyone?), and then had a little extra time to spare.
Sooo there I was, setting the table for non-existent dinner guests with no fancy dinner cooking in the oven--and no plans for cocktails out of chic straws that evening.

I don't have anything to serve. Except sweet potato puffs, and wine. I always have wine.

But check out this lovely fall view of Bishop Creek.

Maybe take it all in while you enjoy a glass of Bishop Creek Wine? See what I did there?


Let's talk a minute about the blanket scarf. Every blogger in blog land seems to have one of these blanket scarves in their fall tablescape. They also seem to be wearing them all over fashion blogland. My blanket scarf is so soft, snuggly, and I love the print. But to be honest, I have not worn it more than 5 minutes. It's HOTTER THAN HECK. I mean this thing is H-O-T. I immediately have a sweat mustache about 90 seconds after it's draped over my shoulders. It does better as a little blankie on the couch, or draped over this table to be honest.

Have you ever set up your dining table with no dinner plans? 
Does your blanket scarf do more good on the couch or the table than on you?

P.S. In some of the photos above, you can see a sneaky peek of my new chevron jute rug. See more of it here. I'm loving it!

Wednesday, May 13, 2015

Nursery Details: Billy the Bison

I love the animal bust trend all over blogs right now.  I knew I wanted one in the nursery. But didn't want something too modern. I wanted to keep the vintage and preppy theme in the room.

If you remember we added our own flair to a vintage find in our dining room. We gave a $5 flea market find a makeover.

See the before here!

Anyway, back to the Billy Bison.

For this project we used We used the Billy in the Junior size from Cardboard Safari. We chose the classic tan color. I'd seen people paint these, and maybe if we ever change it up, we will do that. But I liked the plain classic tan for this project. It went best with the look of the rest of his room.


It took about 20 minutes to put together. I should point out, that it would have taken less time, but I thought I was super smart and didn't pay much attention to the directions. So I realized I messed it up halfway through---read the instructions, then did it the right way pretty easily.

For the backing we took apart the thrift store frame, and covered the back cardboard in fabric. To secure Billy Jr to it we turned to our trusty staple gun. That's it!


We love the way it looks on his mini gallery wall above his dresser/ changing table. We're really happy with it and know we can use it even as he grows and gets a 'big boy room' in a few years.
photo credit AB Photography

See more of Ben's vintage nursery!
Check out the wild and crazy before of that beautiful blue dresser makeover!

Thanks to Cardboard Safari for providing Billy the Bison for this project! All opinions are my own.

Thursday, January 22, 2015

Easy $4 Barnwood Entry Shelf

This was such a simple DIY--a tutorial is not needed. But I still really love it in our home and I want to share how simple and cheap it was!


We basically went outside to our scrap pile of barn wood, picked a board and took a piece of sandpaper to the rough spots then wiped it down. That was it.

Our wood pile...photo from the summertime obviously!

We have really big plans for these beautiful beams for the basement...but...back to the shelf....

We then hopped in the jeep for our every Saturday morning trip to Menards---and spent about 4 dollars total on 2 brackets. We got them in the oil rubbed bronze color to match the hardware in the house.

I picked the height, just close enough to the entry mirror--Adam found the studs and placed the brackets.

Just have to double triple check that it's level before the board is secured...

It was perfect to decorate for Christmas with my little drawer of trees and snow.


I used to have my sewing machine table there. Way back in the Fall of 2013:

But although our entryway is pretty large it still felt a tad crowded when we were greeting friends at the door.
The shelf takes out the bulk but still let's me display a few items and put a vase of fresh flowers if I want! It's a perfect spot for a little flame-less candle and even a few framed photos leaning too.

We're pleased with the final look for now, but if I found skinny entry table I loved--it would easily go right under this shelf. The shelf would of course be removable with a little caulk and paint too.


Easy DIY Barnwood entry shelf
2 Brackets (1.97 each Menards)
Barn wood: free (from our stash)
Total spent: $4
Total time: 20 minutes (the hour we spent schlepping around Menards on a Saturday morning is not being counted)

Anyone else do any totally simple DIY's lately? Any DIY's with barn wood?

Thursday, October 23, 2014

Flea Market Finds: Fall Front Porch

If you've been reading this blog for awhile or you follow me on instagram, you have probably noticed I love getting a good bargain. I'm always up for a flea market or an estate sale. 

Today I'm sharing our Fall front porch decor. I used almost all items from sales and flea markets, and farmer's markets.


Fall front porch 2014.


I grabbed a piece of old barnwood scrap from our pile, and Adam helped me stencil on it. It took less than 10 minutes. I was going to go with something more Fall-like with "Harvest" etc, but then I figured a plain Welcome can be used for other seasons too.


I made this tie DIY wreath while catching up on my dvr one weekend. No tutorial needed. Just cut pieces of burlap (I used white and regular brown) to a wire wreath and finished! Very easy, but sort of messy with all the strings.


The pumpkins, Indian corn, and mums are from the local farmer's market.


(We had big plans to landscape this summer but we didn't get to it...Pretend there is beautiful stone landscaping, lush greenery, and rock instead of the cheapo mulch that's there now)....Next year I suppose....
The pumpkin and cat on a stick in the yard are from my Momma.  I will put these two away after Halloween next week, and then the rest of the porch will still be Thanksgiving appropriate. 


All of our decor, except the rug is either from an estate sale, flea market, farmer's market, or thrift store.

Here's the breakdown of how much everything was, and where it's from:


Basically $20 worth of decor, not counting the 10-15 bucks we probably spent on pumpkins and such. But I really just shopped my house for all the supplies I needed. I will most likely use all of these items for Christmas decorating too this year.

Do you decorate your front porch for Fall? 
Get anything good at any sales or flea markets lately?

P.S. We are in the middle of a redesign on the blog, so excuse the mismatched colors etc., it's slowly but surely getting there!

Friday, June 27, 2014

New Art: Dad in house!

We have some new semi-DIY Art in the living room/hallway. Adam has been on me to get stuff hung up in this house. I guess he's tired of staring at bare walls. Hence my golden mirror gallery wall--which already needs some updated photos, we've added more! Lots more!

But today I'm sharing something different on the walls.

If you've been a reader for awhile you know my dad did our beautiful stonework on the front of our home, and the fireplace. By himself. Just my dad.
He pretty much moved in with us for a few weeks at a time and worked 12 hour work days jamming out to the radio, cutting the stones, mixing the mortar, and placing the stones to the fireplace and exterior of the house.
He doesn't do this for a living or anything, it's sort of a hobby for him. When we told him we were building we nicely asked for his help with the stonework. Not sure if he knew what he was getting into...however, it's our favorite feature on both the inside and the outside of the home. It's very special to both Adam and I.

So I was playing around with the Waterlogue app, and turned these photos:


into these photos:

I emailed them to a buddy at a local print shop, and ~bippity boppity boo~...I have some beautiful prints!


I spray painted some old wood frames from the thrift store (which I forgot to take a BEFORE photo of! I'm slacking lately!) and also spray painted mattes white since they were an ugly peach color.


I'd say I spent less than 20 bucks for both prints and the revamped thrift store frames and mattes combined. Not bad for some large art pieces with meaning. Am I right?


We hung them in the living room hallway. It's a nice reminder of my dad's hard work, and it's nice to have meaningful artwork in our home for us to see, and our guests too!

PSSSSTTTT! Read more about my dad doing the stonework himself on our home Here and Here!


Do you have meaningful artwork in your home?
Have you tried to Waterlogue any of your favorite photos? 
Are you late to the Waterlogue party too?

Friday, May 30, 2014

A Dining Room Centerpiece...from a Barn?

My dining room table has a new center of attention....


It's a really an old chicken feeder. Doesn't really scream dining room table at first glance...by the looks of the next photo, right?

Well, I added a little greenery and a table runner..

I love how long this is. Since our dining room table it longer than most, most of the runners and centerpieces I find don't do the trick, but both of these worked perfect!

I added the same greenery to the top of my dumpster dive wine rack!

And plus a set of "twinkle lights" on a timer which I got on super duper clearance after Christmas...and voila!

It adds a nice twinkle light in the evening when we are relaxing!

I love it. It can easily be switched out to flame-less candles, or as a succulent planter! It would look cute in the early Spring with my golden buns! I even thought about it going on our fireplace mantle in the winter filled with evergreen snips or pinecones... 
I did some pin-searching and found there are a TON of other people doing the same thing with chicken feeders on pinterest


See more about our DIY Farmhouse Dining Room Table and the DIY Farmhouse Bench and updates on the dining room here!
Centerpiece is a flea market find.
Greenery Garland is from Hobby Lobby
Teal Table Runner is from HomeGoods.
Check out the pottery barn look alike wine rack above the China cabinet that was found in the dumpster!


Do you have anything that originally in a barn in your house?
What else can I do with my new chicken feeder!?

Friday, May 16, 2014

A Golden Gallery Wall

Last weekend I was on mission “Start Hanging Stuff on Walls”. I  rummaged through my stash of frames and mirrors in the basement. I remembered I had a few gold mirrors I was hoarding saving for just the perfect spot.


And I also had one very large red mirror that needed a new paint job stat. 
But guess what?
I forgot to take a photo of the big old red mirror before it got a beautiful makeover. I know, bad blogger.

I had 1 can of spray paint, a nice day, and a mission to complete. I taped my mirror up, gave it a few coats of gold spray paint.  I contemplated spraying all the mirrors into one gold color, instead of having a hodge-podge of real and fake gold mirrors. But, one group text to my home decor advisors (read: best friends) and the vote was hodge-podge of golds. So only one mirror got the golden spray treatment.

I let it dry for roughly one hour. Mostly because I was antsy. I decided it was too shiny. I added some rub & buff in antique gold to give the mirror some depth. It also brought out the details with just one quick rub.


My dear husband got out his drill and we just eyeballed where we wanted the mirrors. Up they went.

Nope, no silly cutting out shapes in newspaper. Although, we probably should have gone this route---since I know it’s tried and trusted in blogland. But, we were super tired from working on stuff all day. So up they went.
And we love them.


 Going up the steps..

I think I need another baby mirror above the mini one I already have...

Our monogram...

Remember my monogram story? Well, it got thrown in the mix too. I think  it adds a little different pizzazz to the space. I may try to add something else a little different on this gallery wall too!

From the top of the steps...

View from the loft.

I plan to add a few more to the mix when I spot some while out thrifting and at flea markets this summer. (Almost flea market season WOOHOO!!)
I prefer to find mirrors that are already gold or brass, but, I’m not against spraying them and giving them a makeover!


Do you have a gallery wall in your home? 
Would you add other items besides mirrors to the mix? Like what?
Related Posts Plugin for WordPress, Blogger...
Follow on Bloglovin
Web Analytics