Showing posts with label decor. Show all posts

Friday, November 13, 2015

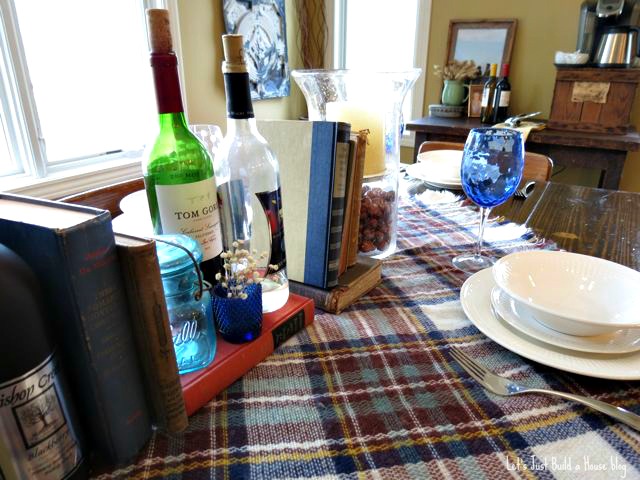
Dinner Party: Serving Wine...Only Wine.

I've never did the ~holiday tablescape~ thing before.  To be completely honest...I do sort of think it's a tad crazy to set up a fancy table setting just for pictures on the internet. Maybe some people really have people over after they set this all up and enjoy an elegantly styled dinner and drink fancy sounding drinks. They maybe even use those cute paper straws--and maybe they don't get soggy.

Today, I officially join the other bloggers in the crazy club--errr imaginary guest table.  My mother-in-law was cleaning out her basement and gifted me some old white tableware. Plus, I had an entire day off to myself this week. Adam worked and Ben went to the sitter. I caught up on laundry, gave Scout a bath, watched reality tv (90 Day Fiance anyone?), and then had a little extra time to spare.
Sooo there I was, setting the table for non-existent dinner guests with no fancy dinner cooking in the oven--and no plans for cocktails out of chic straws that evening.

I don't have anything to serve. Except sweet potato puffs, and wine. I always have wine.

But check out this lovely fall view of Bishop Creek.

Maybe take it all in while you enjoy a glass of Bishop Creek Wine? See what I did there?


Let's talk a minute about the blanket scarf. Every blogger in blog land seems to have one of these blanket scarves in their fall tablescape. They also seem to be wearing them all over fashion blogland. My blanket scarf is so soft, snuggly, and I love the print. But to be honest, I have not worn it more than 5 minutes. It's HOTTER THAN HECK. I mean this thing is H-O-T. I immediately have a sweat mustache about 90 seconds after it's draped over my shoulders. It does better as a little blankie on the couch, or draped over this table to be honest.

Have you ever set up your dining table with no dinner plans? 
Does your blanket scarf do more good on the couch or the table than on you?

P.S. In some of the photos above, you can see a sneaky peek of my new chevron jute rug. See more of it here. I'm loving it!

Friday, May 30, 2014

A Dining Room Centerpiece...from a Barn?

My dining room table has a new center of attention....


It's a really an old chicken feeder. Doesn't really scream dining room table at first glance...by the looks of the next photo, right?

Well, I added a little greenery and a table runner..

I love how long this is. Since our dining room table it longer than most, most of the runners and centerpieces I find don't do the trick, but both of these worked perfect!

I added the same greenery to the top of my dumpster dive wine rack!

And plus a set of "twinkle lights" on a timer which I got on super duper clearance after Christmas...and voila!

It adds a nice twinkle light in the evening when we are relaxing!

I love it. It can easily be switched out to flame-less candles, or as a succulent planter! It would look cute in the early Spring with my golden buns! I even thought about it going on our fireplace mantle in the winter filled with evergreen snips or pinecones... 
I did some pin-searching and found there are a TON of other people doing the same thing with chicken feeders on pinterest


See more about our DIY Farmhouse Dining Room Table and the DIY Farmhouse Bench and updates on the dining room here!
Centerpiece is a flea market find.
Greenery Garland is from Hobby Lobby
Teal Table Runner is from HomeGoods.
Check out the pottery barn look alike wine rack above the China cabinet that was found in the dumpster!


Do you have anything that originally in a barn in your house?
What else can I do with my new chicken feeder!?

Friday, May 16, 2014

A Golden Gallery Wall

Last weekend I was on mission “Start Hanging Stuff on Walls”. I  rummaged through my stash of frames and mirrors in the basement. I remembered I had a few gold mirrors I was hoarding saving for just the perfect spot.


And I also had one very large red mirror that needed a new paint job stat. 
But guess what?
I forgot to take a photo of the big old red mirror before it got a beautiful makeover. I know, bad blogger.

I had 1 can of spray paint, a nice day, and a mission to complete. I taped my mirror up, gave it a few coats of gold spray paint.  I contemplated spraying all the mirrors into one gold color, instead of having a hodge-podge of real and fake gold mirrors. But, one group text to my home decor advisors (read: best friends) and the vote was hodge-podge of golds. So only one mirror got the golden spray treatment.

I let it dry for roughly one hour. Mostly because I was antsy. I decided it was too shiny. I added some rub & buff in antique gold to give the mirror some depth. It also brought out the details with just one quick rub.


My dear husband got out his drill and we just eyeballed where we wanted the mirrors. Up they went.

Nope, no silly cutting out shapes in newspaper. Although, we probably should have gone this route---since I know it’s tried and trusted in blogland. But, we were super tired from working on stuff all day. So up they went.
And we love them.


 Going up the steps..

I think I need another baby mirror above the mini one I already have...

Our monogram...

Remember my monogram story? Well, it got thrown in the mix too. I think  it adds a little different pizzazz to the space. I may try to add something else a little different on this gallery wall too!

From the top of the steps...

View from the loft.

I plan to add a few more to the mix when I spot some while out thrifting and at flea markets this summer. (Almost flea market season WOOHOO!!)
I prefer to find mirrors that are already gold or brass, but, I’m not against spraying them and giving them a makeover!


Do you have a gallery wall in your home? 
Would you add other items besides mirrors to the mix? Like what?

Friday, May 2, 2014

Plan for Plates

When your husband says to you every week:
  • "Start hanging stuff on the wall!" 
  • "What kind of junk are you bringing home now?"
  • "You are trying to make this house look like #&$*%@& Pottery Barn!"

It CAN get annoying. Especially when you are just trying to do what he asked demanded you in the first place. To start hanging stuff on the wall!

I think he's tired of staring at blank walls. But I'm kind of picky about putting holes in the walls at this house. He was too...but now he's over it!

Well I'm working on it. I finally made a decision about what I wanted to do with this odd shaped teeny portion of a wall that we just had to have to hold the second story up and all...


On the living room side of the weird wall I stuck a big old vase with sticks in it. Done. Love it.

But the kitchen side was a different story all together.
Does it have to be something kitchen-y?
What kind of decor can I put on this tiny little space that I won't hate?
Can I find something that I can DIY or makeover so it doesn't cost a fortune?

In comes plates....
They looked so cute at the thrift store. But what would I even do with them? Then I had a little pin-spiration!

These were each less than a buck each. I plan to do a little collector wall hanging! I want to incorporate these colors, but many more. I'm on the lookout for some with teal, green, red....maybe even some plum toned purple plates if I can track a few down.

My inspiration:
 Kelly @ View Along the Way
Love what Kelly did with her plate wall. I like the way it wraps around the side. Which is what I plan to do! I think Kelly shows us that you can make any design with the plates you want. Fit it to your own home. Love that.


I like this mix of old and new styles...
HomeEdit
This collection wall from CasaSugar is interesting because the plates slightly overlap in some spots sort of like Kelly's. It's different and makes it more of one piece rather than several plates in a collection.
CasaSugar

Do you have trouble committing & nailing things to the wall? 
Any tips for a non-picture hanger committer? Do you have any collections on your wall?


p.s. please go to the original source before you pin any of these and pin from there! Thanks!

Monday, December 16, 2013

Decking the Halls! (for 4 bucks) Yep.

Have you had enough Holiday home tours yet in blogger-land? I hope not. Don’t worry mine is short and sweet. With a treat at the end.
I was in bed sick alllll weekend long so I didn't get to finish taking all of my photos. 
So this will be more like the nickel tour today!

Hurry in...it's snowing!


Here is a better shot of our front door wreath. I rescued it from an estate sale in a big box of wreaths and garland for 50 cents. Watch and see how far this box of greenery takes us this Christmas..
I took off all the ugly bows and ribbons, spritzed the wreath with some gold spray paint for some pizzaz. Then I hot glued some ornaments from the dollar store, and smack a big sparkly gold "N" on it to finish it off. I love it.

When you come in the front door you will immediately see another rescued wreath from the same estate sale box-o-greenery.
 This one got spritzed of white spray paint and real pinecones hot glued on there. I needed a little something else, so I made some rosettes out of scraps of lace. I like this one so much I think I will use it for my front door wreath after Christmas.
DIY wreath.
After you walk in the entry you see our beautiful tree. She is new this year. Last year we had a real tree. Which we LOVED. We would have gotten another real tree this year....

But this one came unexpected to us in July. My Aunt and my parents got it for me at a moving sale, get this...for: $3.
That is not a typo. $3, 10-foot tree. Pre-lit. With the stand and everything. We are lucky ducks. It fits the spot next to our fireplace perfect.


And next, our mantel.
I used garland from the same estate sale box as the wreaths. Luckily this was still in the original packaging.  I didn't need to rip anything off.
I took it outside and gave this a spritz of white to match the snowy look on our tree. It took about 5 minutes of random spritzing.
The white doesn't show up in the photos as much as in person...


The Noel sign was a craft night project. I just cut the boxes and stenciled right onto the burlap. The hard part was stringing the twine through the burlap. The trick was tweezers!
you don't see our dirty fireplace doors...amiright?
Our dining room is festive too.


On top of my china cabinet sits my lantern collection. They are now surrounded by few mini trees. Also from…you guessed it, the box of estate sale greenery. They too got some white spray paint spritzes to freshen them up and match the other greenery in the house.


The believe banner was made at craft night too. So easy!


These trees will hold our holiday cards as we get them through the next few weeks. It's an easy way to display them. I didn't even put hooks in them, just perched them in the tree branches.

Thank you for visiting!

Linking up today for the Dare to DIY: Deck the Halls....with NewlyWoodwards, Primitive and ProperDecor and the Dog, and Maybe Matilda.

If you haven't entered our giveaway from  PorterDesignCo to with a set of 3 vintage postcard ornaments enter below! Today is the last day! More info in this post.


a Rafflecopter giveaway
Related Posts Plugin for WordPress, Blogger...
Follow on Bloglovin
Web Analytics